Beauty Blog: Easy winged eyeliner technique
Today I’ll be showing you how to do winged liner, with easy mode on. This fall (and about every fall prior) it’s all about the dark smokey eyes accompanied by the winged liner. It’s a trial and error thing when doing winged liner correctly, so don’t worry.

Welcome back and I hope you’ve had a great fall break.
Today I’ll be showing you how to do winged liner, with easy mode on. This fall (and about every fall prior) it’s all about the dark smokey eyes accompanied by the winged liner. It’s a trial and error thing when doing winged liner correctly, so don’t worry.
This is a great way to practice and work your way up.
Things you will need:
-Tape (yes, you will need good ole’ Scotch tape)
-Liner of your choosing. It can be a pencil, a gel liner or a liquid one.
I’ll be using liquid since that’s my preferred liner tool.
First, get a piece of tape. It shouldn’t be too long. Place it on the back of your hand to get rid of some of the stickiness so it won’t hurt when you peel it off.
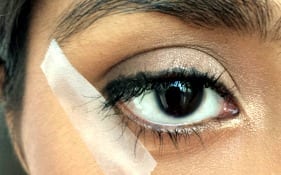
Then place it on the outer corner of your eye. A good tip is to follow your bottom lashline and imagine that it’s extending upwards.
 I already have a pencil liner on my top lashline prior to taking pictures.
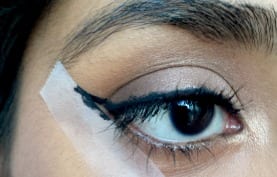
Next, create a line from the inner corner of your eye to the outer corner. If you’re using a liquid liner, use short strokes instead one long one. It makes it less accident prone. If you’re using gel liner, dip your brush into the pot of gel liner and then slowly drag the brush across your lash line. I wouldn’t recommend using short strokes, because it might clump up. Instead, go slower and you can start and stop.
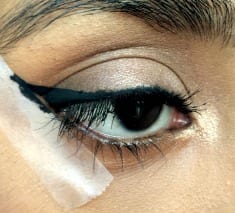
Here I’ve extended the line of my eyeliner out just by using the tape. See the little marks on the tape? I pressed against the tape to get a precise line. Don’t worry if you get your product on the liner, that is what it is there for! It helps to correct any uneven lines that you might have done without the tape. It also is a guideline on how to bring up your wing.
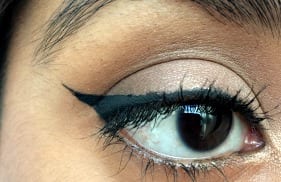
Here is where it can get tricky. From the endpoint of the line you just created, bring it back down. This should create a triangle shape. Then fill in any gaps there might be, and you should get something like the photo above.
 Take off the tape, and you’re left with a crisp edge! You’ve made it!
Feel free to do this several times with the tape to get a feel for your eye shape and your ability to hold the liner steady.
Here are some liner recommendations to get you started:
- L’Oreal Infallible Lacquer Liner 24H in Blackest Black
- Wet n Wild Megaliner (what I used here) in Black
- Maybelline Eyestudio Lasting Drama Gel Eyeliner in Blackest Black
You can also do this technique with a colored liner, you would just have to place the colored liner first, and then create a thin black liner on top. Sephora Collection at Sephora makes a great range of colored liners in their Contour Eyeliner Pencil 12 Hr Waterproof line, and it’s only $10!
Good luck and may the wings of your liner always be even!
Somayea is a junior at UT and an aspiring beauty blogger.
Edited by Jessica Carr


