Beauty Blog: Two makeup looks for Thanksgiving
I’ll be doing two Thanksgiving looks for today. Feel free to come back to this post on Thanksgiving day to recreate either of these looks. I’ll be focusing on eyes, because I personally always have trouble on what to do, I created a simple look, for maybe a family event or if you just want to go simplistic.

Today will not be another edition of Beauty Dictionary I’m afraid, but I’ve got better news! I’ll be doing two Thanksgiving looks for today. Feel free to come back to this post on Thanksgiving day to recreate either of these looks. I’ll be focusing on eyes, because I personally always have trouble on what to do, I created a simple look, for maybe a family event or if you just want to go simplistic.
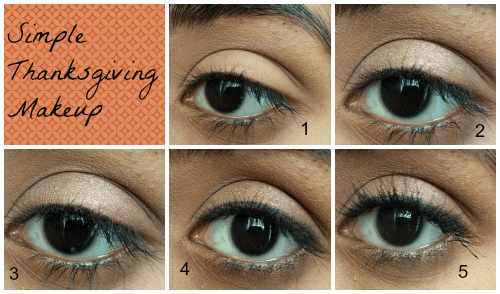
Start off with clean eye and then use a eyeshadow primer all over your eyes. This will help increase the longevity of your shadows, and make it more vibrant. There are several on the market, and it’ll be useful for your everyday makeup.
-
Use a shadow about brown shade one to shade darker than your skin. This will be a crease color, and will help to blend out any further colors. Place that in your crease.
-
Apply a shimmery shade. I used a taupe shade since I have darker skin. If you’re lighter than me, you can use a shimmery bronze color, or even a shimmery pale gold.
-
I used a blending eyshadow brush to blend out the lid color. You can also use that crease color we used earlier to blend out further
-
Add your eyeliner, winged or not. I opted not to do a winged liner just because I wanted to keep it as simple and quick as possible.
-
Finally add your mascara!
This is a simple look, that can be done very quickly!
I just added on from the previous tutorial. So this is great if you are celebrating with some friends, or maybe you like a little more than a simple look.
-
I added tape, to create a crisp line and also to help with winged liner. This is great if you struggle with winged liner.
-
I added a darker color on the outer corner of my eye, and slightly into the crease, this adds some depth and darkness. A brown shade 2 or 3 shades darker will do the job.
-
I blended out the darker shade so there is no harsh lines. Again feel free to use the crease shade we used in the first tutorial to blend out the color.
-
To do this winged liner, just line your upper lashline as you usually do, then use the tape to your advantage. You can follow the tape and stop whenever you feel like the length of your wing is to your satisfaction. Feel free to make a mess on the tape, it’s there to prevent any liner from getting on your skin!
-
Finally mascara!
I didn’t add any lips, but these would look great with nude lips, a wine color or a classic red!
Thanks for stopping by, and have a great Thanksgiving break!
Somayea is a junior at UT and an aspiring beauty blogger.
Edited by Jessica Carr
